
What You Need to Know Before Adding an Expansion Tank to Your Water Heater
Adding an expansion tank to water heater systems is a straightforward upgrade that protects your plumbing from dangerous pressure spikes caused by thermal expansion.
Here’s a quick overview of the process:
- Turn off the cold water supply and power to your water heater
- Size your tank — a 2-gallon tank works for most 40–80 gallon heaters; larger units need 4.8 gallons
- Pre-charge the tank to match your home’s water pressure using a tire gauge and air pump
- Cut into the cold water inlet line and install a tee fitting
- Thread on the expansion tank with Teflon tape and secure it with a mounting bracket
- Restore water and power, then check all connections for leaks
Every time your water heater fires up, the water inside expands. In a closed plumbing system — common in Florida homes with backflow preventers or pressure-reducing valves — that expanding water has nowhere to go. Pressure builds fast. Without an expansion tank, that pressure stresses your pipes, wears out fixtures, and can even trigger your temperature and pressure (T&P) relief valve repeatedly. Over time, this leads to leaks, costly repairs, and a shortened water heater lifespan.
I’m Joey Denick, and with over 20 years of hands-on plumbing experience, I’ve seen the damage that skipping an expansion tank can cause — and how simple adding an expansion tank to water heater systems really is when you follow the right steps. Let’s walk through everything you need to know to get it done right.

Why adding an expansion tank to water heater systems is essential
When we talk about thermal expansion, we’re talking about basic physics. When water is heated from 50°F to 120°F, its volume increases by nearly two percent. In the old days, plumbing systems were “open,” meaning that extra volume could just push back out into the city water main. However, modern building codes in places like Pinellas and Hillsborough Counties now require “closed” systems to prevent backflow and protect the public water supply.
If your home has a backflow preventer, a check valve, or a pressure-reducing valve (PRV) on the main line, you have a closed system. When that water expands inside your heater, it’s trapped. This creates massive pressure spikes—sometimes skyrocketing to over 150 PSI.
Without an expansion tank to act as a “cushion,” this pressure looks for the weakest link. You might notice your temperature and pressure (T&P) relief valve dripping. That valve is an emergency safety device, not a pressure regulator; if it’s dripping, your system is screaming for help. Constant pressure spikes can lead to water heater leaks what you need to know, burst pipes, and premature failure of faucets and toilets.
Furthermore, the Section 608.3 Plumbing Code specifically mandates thermal expansion control in closed systems. Beyond just following the law, adding an expansion tank to water heater setups prevents pipe stress and fixture damage. It also helps avoid galvanic corrosion—a nasty process where dissimilar metals (like copper and steel) react and eat each other—provided you use the right fittings.

Sizing and preparing for your expansion tank installation
Before you run to the hardware store, we need to make sure you get the right size. If the tank is too small, it won’t absorb enough volume, and you’ll still have pressure issues.
Expansion Tank Sizing Chart
| Water Heater Capacity | Recommended Expansion Tank Size |
|---|---|
| Up to 60 Gallons | 2.1 Gallons |
| 60 to 80 Gallons | 4.8 Gallons |
| Over 80 Gallons | Multiple Tanks or Large Custom Tank |
Once you have the tank, you must “pre-charge” it. This is the step most DIYers skip, and it’s the #1 reason tanks fail early. Inside the tank is a rubber diaphragm with air on one side and water on the other. You need to match the air pressure in the tank to your home’s static water pressure.
- Check your home pressure: Use a water pressure gauge on an outdoor hose bib. Most homes in the Tampa and St. Petersburg area sit between 50 and 60 PSI.
- Adjust the tank: Locate the Schrader valve (it looks just like a car tire valve) on the expansion tank.
- Use a tire gauge and air pump: If your home pressure is 60 PSI, pump the tank up to 60 PSI. According to This Old House, mismatched pressure is the leading cause of the diaphragm tearing.
If you aren’t comfortable checking your own water pressure or handling the tools, we always recommend looking into professional water heater replacements to ensure your entire system is up to code and safe.
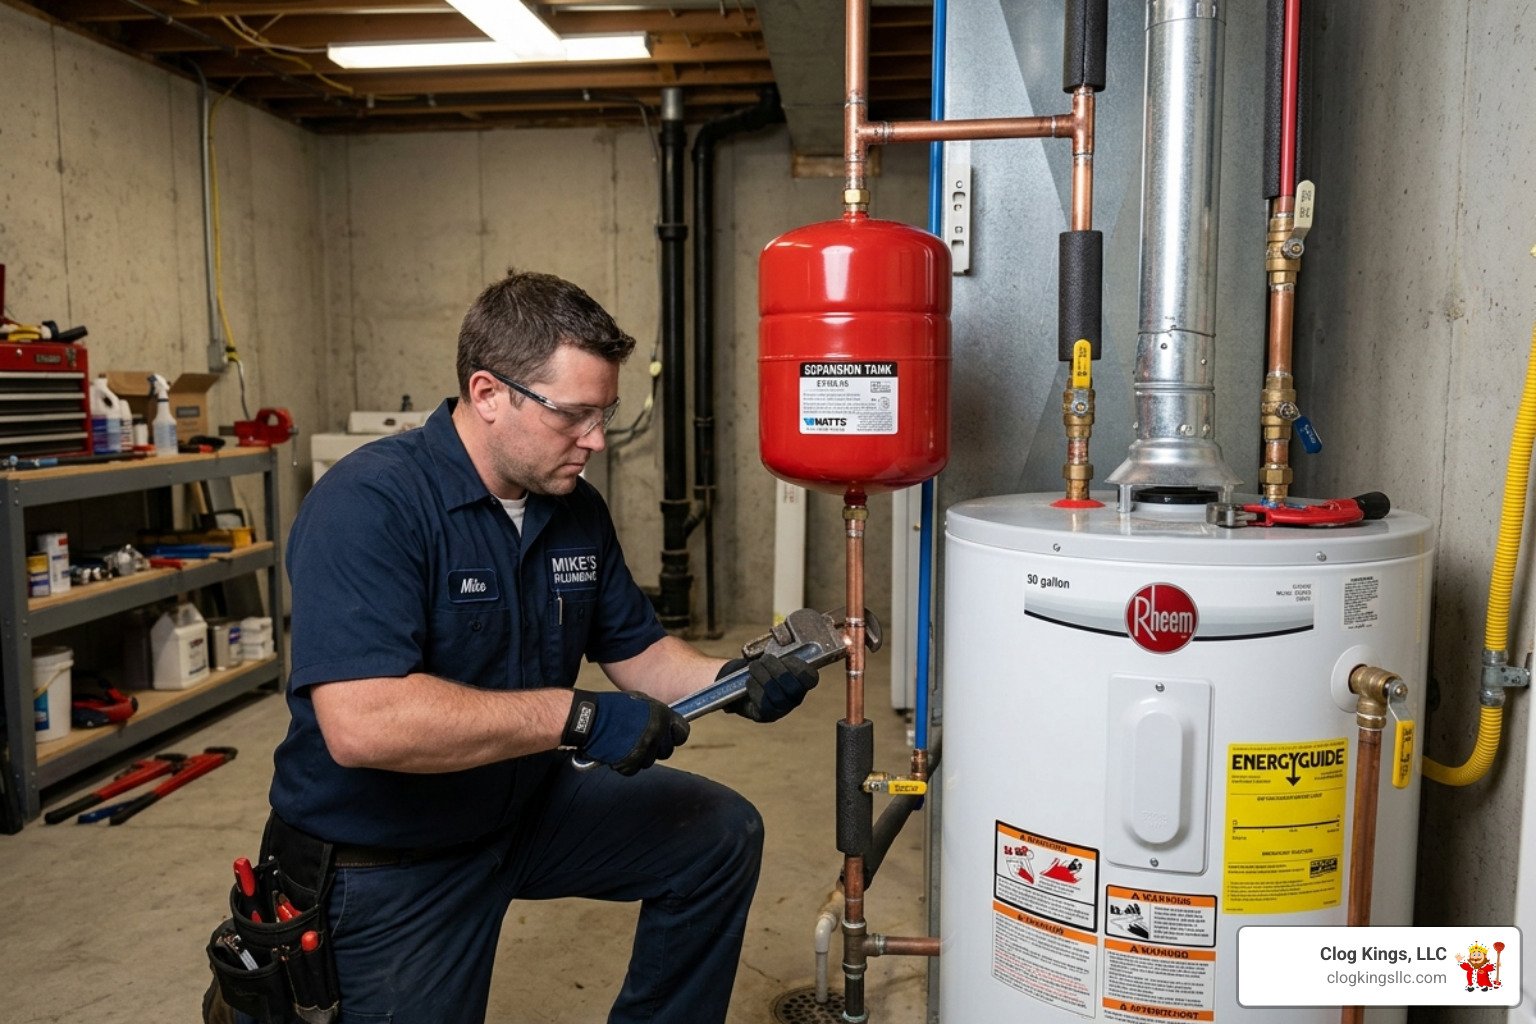
Step-by-step guide: Adding an expansion tank to water heater units
Ready to get your hands dirty? First, let’s gather our tools. You’ll need a pipe wrench, a pipe cutter, Teflon tape (or pipe dope), and a copper tee fitting. If you’re working with copper, you’ll need soldering supplies; if you want an easier route, push-fit connectors (like SharkBite) are often acceptable for DIYers, though we prefer the longevity of a soldered joint.
Preparing the cold water line for adding an expansion tank to water heater
The expansion tank must be installed on the cold water inlet line. Never install it on the hot water side; the heat will degrade the rubber diaphragm in record time.
- Shut off the water and power: Turn off the cold water supply valve. If you have an electric heater, flip the breaker. If it’s gas, turn the dial to “Pilot.”
- Drain the pressure: Open a hot water faucet somewhere in the house to let the pressure out.
- Drain the heater slightly: You don’t need to empty the whole thing, just enough so water doesn’t spill out when you cut the pipe.
- Cut the pipe: Use your pipe cutter to remove a section of the cold water line about 12 to 18 inches above the heater. This is where your tee fitting will go.
- Deburr: Use a deburring tool to smooth the inside and outside of the cut pipe. This prevents leaks and keeps the water flowing smoothly. If you’re unsure about this part, calling a local water heater installer can save you from a soggy basement.
Mounting and connecting the tank like a pro
Now it’s time to get the tank in place. While many people think the tank can just “hang” off the pipes, a full 2-gallon tank weighs about 20 pounds. That’s a lot of stress on your plumbing.
- Orientation: Most manufacturers recommend mounting the tank vertically (pointing up or down).
- Horizontal mounting: If you are tight on space, you can install it horizontally, but you must use support brackets or mounting straps to secure it to a wall stud.
- The Dielectric Union: If you are connecting a steel tank to copper pipes, use a dielectric union. This prevents galvanic corrosion from eating through your pipes.
- The Connection: Apply 4-6 wraps of Teflon tape to the threads of the pipe nipple. Hand-tighten the tank onto the tee fitting first, then give it a small turn with a wrench to snug it up. Don’t go Hulk-mode on it; overtightening can crack the fittings.
Finalizing the connection when adding an expansion tank to water heater
With the tank secure, it’s time to see if your hard work paid off.
- Open the water supply: Do this slowly. You don’t want a massive surge of water hitting your new connections.
- Purge the air: Keep that hot water faucet open until the sputtering stops and you get a steady stream of water.
- Check for leaks: Grab a paper towel and wipe down every joint. If it comes away damp, you’ve got a slow leak that needs tightening.
- Restore power: Once the tank is full and air-free, turn the power or gas back on.
If you start hearing odd sounds after the install, check out our guide on why is my water heater making weird noises to troubleshoot the issue.
Common installation mistakes to avoid
Even the best DIYers can trip up. Here are the most common “oops” moments we see in the field:
- Overtightening: This is the most common cause of leaks at the threaded joints. Snug is good; crushed is bad.
- Incorrect Pre-charge: If you don’t match the tank pressure to your home pressure, the tank is basically a paperweight. It won’t have the “room” to accept the expanding water.
- Missing Support: A broken water heater is often the result of heavy components sagging and snapping pipe joints. Always use straps.
- Wrong Location: Installing the tank after a shut-off valve. If you close the valve for maintenance, the heater no longer has access to the expansion tank, and boom—the pressure spikes.
- Skipping the Dielectric Union: In our Florida humidity, galvanic corrosion happens fast. Don’t skip this $15 part, or you’ll be looking for a water heater replacement much sooner than expected.
Frequently Asked Questions about expansion tanks
How long do water heater expansion tanks last?
Typically, an expansion tank lasts between 5 and 10 years. Because they are often installed at the same time as a water heater, they tend to wear out around the same time. We recommend checking the air pressure annually. If you tap the top of the tank and it sounds “thuddy” and heavy instead of hollow, the diaphragm has likely failed and the tank is waterlogged.
Can I install an expansion tank horizontally?
Yes, but with a caveat. While vertical is preferred to reduce stress on the internal diaphragm, horizontal is fine as long as you use robust support straps. Without support, the weight of the water will eventually cause the pipe to bend or leak.
What happens if I don’t install an expansion tank?
In a closed system, you are playing a game of “Pressure Roulette.” You might get lucky for a while, but eventually, you’ll see dripping faucets, leaking pipe joints, or a ruptured water heater tank. If you’ve opted for a tankless water heater installation, check your local codes; many modern tankless units also require expansion protection if they have an internal buffer tank or recirculation pump.
Conclusion
Adding an expansion tank to water heater systems is one of the most cost-effective ways to protect your home from water damage. For a relatively small investment in time and materials, you can add years to the life of your plumbing fixtures and your water heater.
However, we know that cutting into your home’s main water lines can be intimidating. If you live in Pasco, Pinellas, Manatee, or Hillsborough Counties and would rather have the pros handle it, Clog Kings LLC is here for you. We offer 24/7 local service and can ensure your expansion tank is sized, pressurized, and installed perfectly.
Don’t wait for a pipe to burst or your water heater to start leaking. More info about professional plumbing services is just a click away, or give us a call today to schedule your installation!