
Why Eljer Toilet Flush Valve Replacement Is Worth Doing Yourself
Eljer toilet flush valve replacement is one of the most effective fixes for a running, leaking, or weak-flushing toilet — and most homeowners can complete it in under an hour.
Here’s a quick overview of the process:
- Identify your Eljer model — check the tank stamp or part number (e.g., Titan, Canterbury, Diplomat)
- Find the correct flush valve — match the valve height and opening size (2″ or 3″)
- Shut off the water supply and drain the tank completely
- Remove the old valve — turn internal tabs counterclockwise to release
- Install the new valve — seat the gasket, tighten the locknut, attach the flapper
- Test for leaks — turn water back on and flush several times
Eljer toilets have been a fixture in American homes for decades. They’re well-built, long-lasting, and worth repairing — but when the flush valve fails, finding the right replacement part can be surprisingly tricky. Many original Eljer parts are discontinued, and the wrong part won’t seal properly, leaving you with the same frustrating problem.
The good news? Whether your toilet is constantly running, barely flushing, or just making odd noises, a faulty flush valve is often the root cause — and it’s fixable.
I’m Joey Denick, a plumbing professional with 20+ years of hands-on experience, including countless eljer toilet flush valve replacement jobs on vintage and modern models throughout Florida. In this guide, I’ll walk you through everything you need to get the job done right the first time.
Identifying Your Model for Eljer Toilet Flush Valve Replacement
Before you head to the hardware store or click “buy” online, you need to know exactly which Eljer toilet is sitting in your bathroom. Eljer has been around since the early 20th century, and their designs have evolved significantly. A valve that fits a modern Titan model will not work in a vintage Windsor or Emblem.
To start your search, look inside the tank. Most Eljer toilets have a four-digit model number stamped into the back wall of the tank or on the underside of the lid. You might see numbers like 4021 (Diplomat) or 4040 (Patriot). If the stamp is faded, don’t worry—you can also identify the unit by its physical characteristics.
| Eljer Model | Valve Opening Size | Common Part Number | Key Feature |
|---|---|---|---|
| Titan | 3-inch | 495-5400-00 | Large 3″ flapper for high-power flush |
| Diplomat 2 | 3-inch | 738921-100-0070A | Taller overflow tube (approx. 10″) |
| Canterbury | 2-inch | 495-5410-00 | Counter-balance design (5″ overflow) |
| Windsor | 2-inch | 495-5517-00 | Often uses a brass valve or “with holes” design |
| Touch-Flush | 2-inch | 490-6512 | Side-mounted tank ball/arm assembly |
Another critical factor is the date of manufacture. Eljer made a significant design shift in the mid-1990s. If your toilet was made before 1994, it likely uses a flush valve “with holes” in the overflow tube to accommodate specific refill rates. Toilets made after the mid-90s typically use a standard “no holes” design.
If you are struggling to find your specific model, you can consult a directory of plumbing manufacturers to track down older schematics. Knowing your model is half the battle; the other half is measuring the overflow tube height. Measure from the bottom of the tank to the very top of the tube. If your replacement is too tall, the tank will overflow; if it’s too short, you won’t get a full, powerful flush.
Choosing the Right Eljer Toilet Flush Valve Replacement Part
Once you have your model number, you have two choices: OEM (Original Equipment Manufacturer) or “will-fit” alternatives. Because Eljer is now part of the American Standard family, some original parts are harder to find.
- OEM Parts: These are exact matches. For example, part number 495-5517-00 is a classic Eljer staple. Using OEM ensures the gaskets and threads line up perfectly.
- “Will-Fit” Alternatives: Brands like Korky and Fluidmaster make high-quality universal valves. These are often better than the originals because they use modern, chemical-resistant rubbers that stand up to the heavy chlorine found in Florida’s municipal water.
- Touch-Flush Units: If your Eljer has a side-mounted handle that lifts a tank ball rather than a flapper, you have a Touch-Flush unit. These require a specific assembly (like the ProSource 070990) that includes the arm and the tank ball.
To understand why these specific parts matter, it helps to learn more about the history of plumbing fixtures. Eljer was a pioneer in “low-boy” and one-piece designs, which often used unique internal geometries that standard hardware store parts simply can’t accommodate.
Measuring for Compatibility
If you can’t find a model number, grab a tape measure. The three most critical dimensions for an eljer toilet flush valve replacement are:
- The Flush Hole Diameter: Is it 2 inches (standard) or 3 inches (High Performance/Titan)?
- Overflow Tube Height: Measure from the tank floor to the top of the tube.
- Handle Hole Clearance: Ensure the new overflow tube won’t interfere with the trip lever arm.
If you’re noticing water pooling or a constant “hissing” sound, is your toilet running and costing you money? A faulty valve can waste up to 200 gallons of water a day, which adds up quickly on your Hillsborough or Pinellas County water bill.
Tools and Preparation for Eljer Toilet Flush Valve Replacement
Preparation is the difference between a 30-minute fix and a three-hour headache. You don’t need a professional van full of gear, but a few specific tools are non-negotiable.

Your Checklist:
- Adjustable Wrench: For the supply line and the large locknut under the tank.
- Large Channel Locks or a Flush Valve Wrench: Eljer valves often have large nuts that standard wrenches can’t grip.
- Sponge and Bucket: To soak up the last inch of water in the tank.
- Towel: To protect your bathroom floor from drips.
- Screwdriver: Usually a flathead for the tank-to-bowl bolts.
- Safety Gloves: To protect your hands from old, degraded rubber gaskets.
Before you touch a single bolt, you must perform a proper toilet repair shutdown. Locate the water supply valve (usually on the wall behind the toilet) and turn it clockwise until it stops. Flush the toilet and hold the handle down to drain as much water as possible. Use your sponge to get the tank bone-dry. If you leave water in there, it will end up on your floor the moment you loosen the valve.
Step-by-Step Eljer Toilet Flush Valve Replacement Process
Now for the heavy lifting. Replacing the valve is a mechanical process that requires patience, especially with older porcelain that can be brittle.
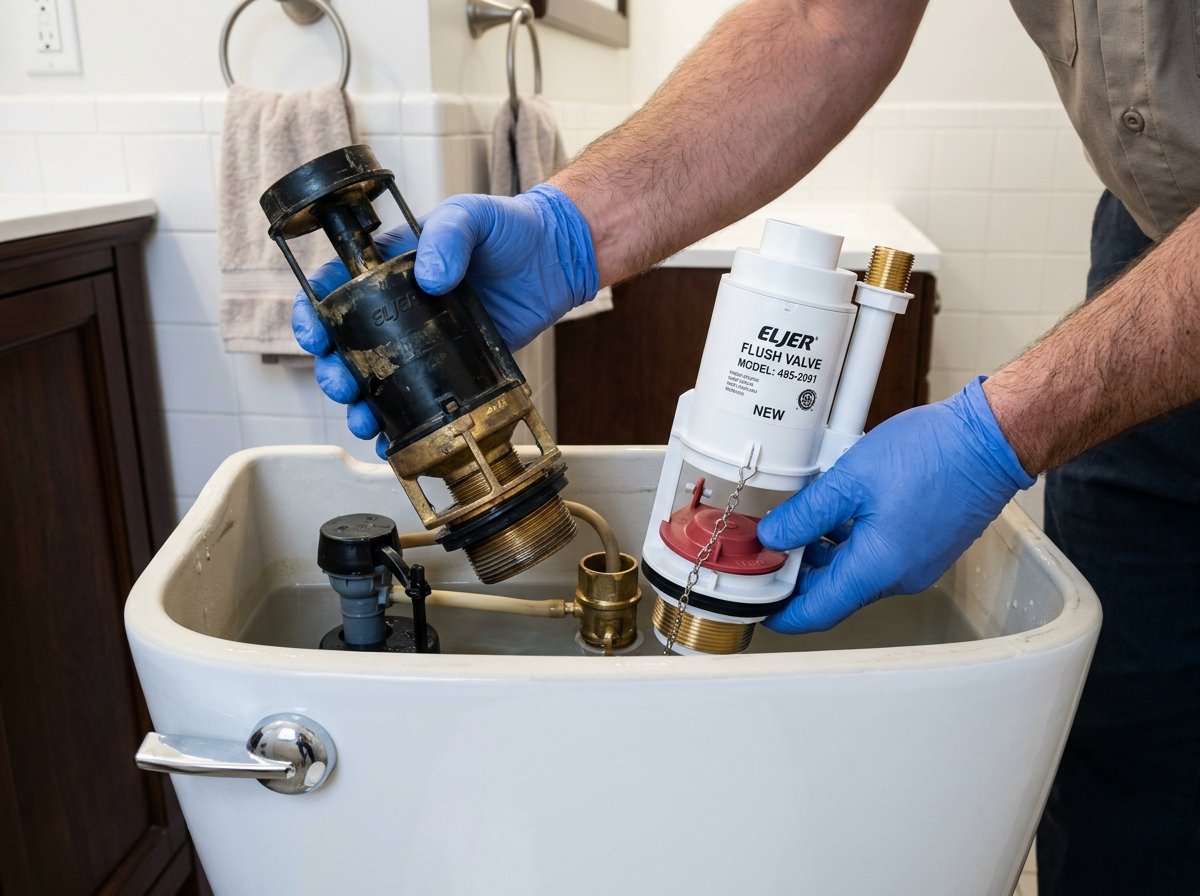
Removing the Old Valve Assembly
Most Eljer flush valves are held in place by a large locknut on the outside (bottom) of the tank. However, some unique Eljer designs use internal tabs.
- Disconnect the Flapper: Unhook the chain from the trip lever.
- Separate the Tank (if necessary): For two-piece toilets, you’ll need to unscrew the tank-to-bowl bolts to reach the locknut. This is a great time to inspect your tank-to-bowl gasket.
- Loosen the Locknut: Use your large wrench to turn the nut counter-clockwise.
- The Eljer “Twist”: Some Eljer valves (like the Silette models) use internal tabs. You may need to reach inside the tank and rotate the entire valve assembly counter-clockwise to release it from the base.
- Clean the Tank Floor: Once the valve is out, use a rag to wipe away any old rubber residue or sediment. A clean surface ensures the new gasket creates a watertight seal.
Ignoring a leaky valve is risky. Over time, how a running toilet becomes a big plumbing problem—it’s not just the water bill; it’s the potential for the tank-to-bowl bolts to corrode and snap, leading to a flood. If you run into a stuck bolt, you can find expert advice on plumbing forums where pros share tricks for removing rusted hardware.
Installing the New Flush Valve
Installation is essentially the removal process in reverse, with a few “pro tips” to prevent leaks.
- Seat the Gasket: Place the large rubber gasket onto the bottom of the new flush valve. Ensure it is seated firmly against the flange.
- Position the Valve: Drop the valve into the hole. Orient the overflow tube so it doesn’t block the fill valve or the flush handle arm.
- Tighten the Locknut: Thread the nut on by hand first to avoid cross-threading. Tighten it with a wrench until it is “snug plus a quarter turn.” Do not overtighten, or you might crack the porcelain tank.
- Attach the Flapper and Refill Tube: Connect the flapper chain to the handle, leaving a tiny bit of slack. Clip the small rubber refill tube from the fill valve onto the top of the overflow tube.
- Reattach the Tank: If you removed the tank, place it back on the bowl with a new tank-to-bowl gasket and tighten the bolts evenly (alternating sides) until the tank is level and stable.
Installation Checkpoints:
- Is the overflow tube 1/2 inch below the handle hole?
- Does the flapper open and close freely?
- Is the refill tube aimed into the overflow pipe?
Troubleshooting Special Eljer Designs and Discontinued Parts
Eljer is famous for its “outside the box” engineering. If your tank looks like a Rube Goldberg machine, you likely have one of their specialty designs.
- Counter-Balance Flappers: Models like the Canterbury or Coventry use a flapper with a weighted back. These stay open longer to allow more water through. If you replace this with a standard “universal” flapper, the toilet may not flush completely. Look for “Eljer-style” counter-balance replacements.
- Valves with Holes: As mentioned, some older Eljer valves have a small hole drilled into the overflow tube. This was designed to “tune” the refill rate of the bowl. If your new valve doesn’t have this, you might notice the bowl water level is too low after a flush.
- Modifying Overflow Tubes: If you bought a “will-fit” valve that is too tall, you can carefully cut it down with a hacksaw. Just remember: once you cut it, you can’t return it! Always measure twice before sawing.
If you’re dealing with a “ghost flush” (where the toilet flushes itself every few hours), got a running toilet? here is why you shouldn’t ignore it. Usually, this means the flapper or the flush valve seat is warped. If a new flapper doesn’t fix it, the entire valve seat is likely pitted and needs replacement.
Frequently Asked Questions about Eljer Flush Valves
How do I know if I need a flush valve with or without holes?
The “holes” in an Eljer overflow tube were a design choice for models made before the mid-1990s. They helped regulate the water flow to the bowl during the refill cycle. If your original valve has them, try to find a replacement that matches. However, many modern “will-fit” kits (like the 495-5517-00-NH) are designed to work without the holes by using a more efficient fill valve. If you use a “no-hole” valve in an old toilet, just ensure your fill valve is adjusted to fill the bowl to the proper height.
Can I cut the overflow tube if it is too tall for my Eljer tank?
Yes! This is a common practice in the plumbing world. If the overflow tube is taller than the handle hole, water will leak out of the handle before it ever goes down the overflow. Use a hacksaw to cut the tube so the top sits exactly 1/2 inch below the bottom of the handle hole. Smooth the edges with a bit of sandpaper so the refill tube clip stays secure.
What should I do if I can’t find an exact OEM replacement?
Don’t panic. Brands like Korky and NuFlush specialize in “will-fit” parts for discontinued Eljer lines. Look for kits labeled “Fits Eljer” rather than “Universal.” These usually include the specific gaskets needed for Eljer’s unique tank floor shapes. If the internal mechanics of your tank are too far gone or the porcelain is cracked, it might be time for more info about professional toilet repair services to discuss a full replacement.
Conclusion
Mastering an eljer toilet flush valve replacement is a badge of honor for any DIY homeowner. These toilets are legendary for their longevity, but like any machine, they need a tune-up every decade or two. By identifying your model, measuring carefully, and using the right tools, you can stop leaks, save water, and restore your toilet’s powerful flush.
The key to a leak-free job is in the details: cleaning the tank floor, not overtightening the bolts, and ensuring the flapper has just enough slack to seal tightly.
If you find yourself staring at a pile of parts and a puddle of water, or if your Eljer model is one of the rare versions that requires specialized professional tools, we are here to help. At Clog Kings LLC, we have decades of experience with Florida’s unique plumbing challenges. Whether you’re in Pasco, Manatee, Pinellas, or Hillsborough County, our team provides 24/7 expert service to get your bathroom back in order.
Contact us for expert toilet repair and let us take the “flush” out of your frustrations!